Sunday, March 29, 2009

Atlas Code 80 Switch Prep Procedures

Atlas Code 80 track and switches have seemingly been around forever, literally since the 1970s or 1960s. They are still sold today because they have one huge advantage: price. An Atlas Code 80 #6 remote switch, which includes a snap relay switch machine and a switch control box, can be bought for $13.35 at Brooklyn Locomotive Works. By comparison, the combined cost of the more widely preferred Atlas code 55 #7 switch with Tortoise switch machine and a typical SPST switch box will run you at least $25 -- and other options such as Peco or MicroEngineering switches are significantly more expensive even than that.

Of course there are reasons Atlas code 80 is so cheap. First, it doesn't look anything like prototype track. Second, functionally speaking the slow-motion switch machines are superior to the old snap-relay variety. And third, there are valid concerns with the Atlas code 80 switches' out-of-the-box reliability.

I use Atlas code 80 in staging because: 1) prototype-like looks aren't important in staging, and 2) with 73 switches combined in my 5 staging areas the cost savings are significant. This means I had to come up with a solution to address the Atlas code 80 switch reliability problems, and that's the topic of this post.

Here is a picture of an Atlas code 80 #6 switch in package next to one that has been prepped for the layout. I've added three circles at places on the prepped switch to help with the explanation of the prep procedures. To get a bigger view simply click on the picture:


As far as I know the procedures here will also work for Atlas' smaller #4 switches. However, I recommend #6's because they are longer, with a wider curve radius, and thus more likely to operate reliability with any N scale equipment.

One point worth noting is that Atlas has improved these switches many times over the decades. Most of the chronic problems that were documented in the 1980s, for example, have been addressed in the current version. The issues that remain are addressed in the steps below:
  1. Open the package. The switch controller and screws can be set aside until if/when you are ready to use them for switch control. The 6 rail joiners should be separated with a cutter, such as the Xuron rail cutter, and trimmed so that there is no excess metal on the ends of each joiner. I then put them in a rail joiner drawer until they are needed on the layout.

  2. Inspect the switch. Look for track out of alignment and test the switch machine manually. Use a truck, such as a Micro-Trains replacement truck, to see if it catches anywhere when run over the switch. Once you've followed these procedures with several switches you'll probably be able to see the problems areas by eye without testing.

  3. Look closely at the rails inside the red circle in the photo above. This is where the closing rails meet the point rails. I find it helpful to use a magnifying visor for this step. In almost all cases the closing rail is not in line with the point rail (the point rail is the one which moves), but instead sticks out a little. This "sticking out" can cause trucks to skip over the bump and in bad cases can lead to derailments. Using a small metal file gently file down the side and top of the closing rail end, and if necessary the end of the point rail as well, until the transition from one rail to the next is smooth. Note that this problem usually affects the diverging route but not the straight one, but just to be safe I file the rails for both routes.

  4. Now inspect the plastic frog inside the yellow circle in the photo above. In some cases the frog is too big and thus can cause wheels to bump up when they travel along the frog. The solution is to file down the top of the frog tip, then file the sides of the frog tip to assure that wheels pass by smoothly all the time.

  5. Check the ends of the point rails (shown inside the green circle in the photo). To be honest I've not seen a problem with these in the current generation of Atlas code 80 switches, but historically the point ends can be off level with the main rails. If so you'll need to add shims under the point rails or file down the rail tops as appropriate.

  6. Now test the switch machine. This can be done by wiring it up per the instructions on the back of the switch package. However, to save time you can take two wires, one black and one of another color, and briefly touch them to the accessory terminals on your DC power pack. Then do the same with the other color wire and the black wire. Test only once, to avoid overheating the switch machine. Again, I've not experienced any out-of-the-box problems with this generation of Atlas code 80 switch machines, but if a problem does arise I want to find it before I install the switch on the layout

  7. Finally, as the switch wires are short you'll probably need to extend them. I strip about 3/8" of insulation off each wire and crimp yellow butt splices (gauge 16-22, as shown in photo) that are found at Radio Shack. I don't add wire to the other side of the butt splice until the switch is on the layout, as until that time you won't know how much additional wire will be needed.
After that the switch is ready for the layout.

Saturday, March 28, 2009

Where to shop for N scale

[Update from the future (October 14, 2010): CharlestonDigitalTrains web site is now showing very low inventory, missing most of the items they used to carry. I'm now using Wig-Wag Trains for DCC stuff. Also, note that Wholesaletrains.com has great prices on Atlas flex track.]

One of the standard first questions that new N scalers ask is "where are the best places to shop". This post is my view as of today. There are a number of really good shops out there, so this list is certainly not complete. But every one of these shops have worked out well for me.

Wig-Wag Trains is a 99% N scale shop located in Albuquerque, NM. I buy the large majority of my N-scale-specific goods from them. Wig-Wag has some unique practices that can take getting used to, but once you are familiar with them you’ll find that they can both save you a lot of money and keep you on top of the latest N scale products well in advance of their release.

Wig-Wag posts their discount policy on a page linked to their main page, and for nearly everything their prices are at least equal to the best anywhere. One special part of their discount policy is that if you reserve a new product in advance – such as a future release of an engine or rolling stock – you get an additional discount that usually results in the best price available anywhere. And, to make planning easier, their News page is continually updated with the latest product announcements giving you plenty of time to send in reservations. I visit the News page at least once per day.

On the quirky side, though, is that Wig-Wag doesn’t have an automated on-line order system. You have to first call them to give your credit card info, then use email to send orders. This also means that if you have a lot of reservations you’ll probably find it helpful to keep track of them in a list somewhere. Wig-Wag is very good about sending the new product to you shortly after it arrives, and on the rare occasion when they make mistakes they are quick to correct them without argument. But still I find it helpful to know what's in the queue and to compare deliveries with what I expected.

The disadvantage of Wig-Wag is that they are so popular and have such a high volume of business that they are sometimes overwhelmed. Their email can get backed up – something that they’ll note on their News page – and responses can get slow. If I need something to be delivered right away I won’t use Wig-Wag because the turnaround time can be unpredictable.

Charleston Digital Trains is run by Mike Gleaton in South Carolina. He specializes in DCC and related products, such as switch machines, and I buy virtually all of my DCC/related stuff from him. There are three reasons for going to Mike: his prices are great (equal to the best on the web), his service is superb, and he’s extremely knowledgeable and helpful about his product area. He often posts answers to questions on various news groups. Sure, this helps advertise for his business, but his answers are free and correct.

Brooklyn Locomotive Works is, like Wig-Wag, an N-scale only (almost) dealer and apparently is the highest volume one in the U.S. I say this because Micro-Trains, an N- and Z-scale only manufacturer, lists BLW as their top dealer for 2008. I like Wig-Wag for the reasons given above but BLW is also extremely price competitive and offers great service. I’ve used them for a few things when Wig-Wag was out of stock, or when I needed an item immediately. They also have occasional sales on older items that beat anyone's prices anywhere. And for some reason they have significantly better prices than anyone on Atlas switches (but they have a large handling fee for track).

Tony’s Trains in Vermont may well be the original DCC-specialist vendor. Their web site is full of useful DCC information and they’ve even produced a few of their own products to meet special DCC needs. I ordered from them a few times before I discovered Charleston, and they seem excellent. I just prefer the personal, knowledgeable service I get from Mike Gleaton.

Those are the web sites I buy from these days. In addition, I occasionally make the trek to Denver for business or personal reasons, and if time allows I stop at Caboose Hobbies. Until recently their reputation was a “very big store with very big prices”. Recently they’ve dropped prices and are now more competitive, though still not on par with the best. They have an active web site, but I only buy from them in person.

This really is a huge store, with at least a dozen aisles at least 60-80’ long (I’m probably understating) and at least a half a dozen model railroads on exhibit. I swear they have at least 8, and probably a dozen, employees there at all times, even midweek, and I’ve never seen less than ten customers in the store at any time.

Their HO stock is massive. They also do a great job with large scale and O, and although their Z area is relatively small I think they have the whole Micro-Trains line. Their N scale area for locos, track, and rolling stock is on the small side. However their N scale modeling supply aisle is incredible.

In addition they have a tremendous selection of non-scale specific items, such as scenery and electrical tools, digital stuff, and especially books and magazines.

Caboose is the place I go when I want to see something before I buy it.

So, those are the current retailers I buy from. Below are a few I've bought from in the past, but don't anymore.

First, eBay. Yes, when you first get into N scale eBay seems like a great place to get stuff, and it is a good way to learn about what products have been released in the past few years. But, in practice it’s not much of a cost saver, if at all, when you consider the time you spend. Also, while at first eBay seems like a good way to get out of stock items, after you’ve been at this for a while you learn that any in-demand out-of-stock item will soon get re-released in a version that’s probably improved.

One example is the Proto 2000 2-8-8-2, which I bought from eBay in 2005. The early versions were not DCC Ready, so my DCC decoder install was especially challenging. I’ve run it only occasionally, so it would have been better if I’d waited for the 2007 version with decoder built in.

The other "shop" I’ll mention is Ye Olde Local Hobby Shop (LHS). Within the hobby there are many people who’ll assert it is your patriotic duty to buy from your LHS to keep them in business. And I can see that, within reason. For example, when we lived in the Kansas City area temporarily in 2005 I discovered Show Me Lines, one of America’s great LHSes. Sure, their discounts weren’t quite what you could get on the internet (20% was their standard), but the owner went out of his way: to help you; to make his shop a friendly place for your kids; and especially to promote the hobby locally. On that last point the owner was incredibly active with local clubs in all scales, and he was quick to tell any visitor about those clubs and welcome the visitor to join. I can see taking a slight price hit to support a shop like that.

Alas, there are 2 train shops within 30 minutes of our home, and neither is worth a second visit. (I’m not counting those "hobby" shops that include a tiny, overpriced, dusty train section apparently just for decoration.) Both of these local shops sell trains at list price, neither has much N or large scale, and on top of that the owner of the one closest to me is rude to his customers. No, that’s not the type of LHS I will support.

Electrical short debugging

As mentioned earlier today, I discovered an electrical short when testing the newly laid upper tier track. At the time I'd inspected the new track and feeders and didn't find the cause.

This evening I tried again. First I finally cut the rail between the upper tier Auto Reverse (AR) section and the main track. Once done I confirmed that the problem was with the main power district, not any of the three AR sections. Then I very closely inspected all the new track and feeders, including switches, and even moved wires around as a precaution, but still did not find the short.

At that point I began to suspect the track laid earlier for the lower and middle tier. I'd successfully tested that track at the time, but haven't run trains on it for over a month, so there is a decent chance that some of the adjacent construction activities could have caused a short. I cut the power bus wire between the I and J terminals in a way that will allow for easy reconnection. Then I tested and confirmed that the problem is with the older track.

At that point I tested the new track with the SD90/43MAC and everything worked great. The good news here is that all the precautions and applied lessons seem to be resulting in better trackwork, especially the switches.

The bad news is that I still have an electrical short on the old track. I inspected everywhere i could reach and removed several staples to look underneath but found nothing. I'll probably need to remove the upper tier bridge, and in order to do that I'll need to finish the rail cutting for the left side of the bridge.

Hopefully I can resolve tomorrow. If not I can continue work on the upper and middle tiers for at least a while before this electrical short blocks progress.

Diamond rail cutting

Ever since I completed the upper tier bridge structure I've had a "to-do" item of cutting the rails on both sides of the bridge in order to make it removable.

The challenge is that the rail gap must be wide enough to prevent electricity from passing across it, but narrow enough to allow the trains to pass smoothly across the gap. It is especially challenging in N scale to get a small enough gap because our wheels are so tiny. We can't use insulation to pad the bridge gaps, as we do the other rail gaps on the layout, because the bridge rails need to come up easily when the bridge is removed.

I tested a couple of thin-blade manual saws on some left over track and found them wanting: in part because it was hard to keep the saw from wandering off course and damaging the track surface; and in part because the back-and-forth saw motion created a lot of strain on the rest of the track.

Then I tested a rotary tool, commonly called by the name brand "Dremel", and it worked great. The only problem was that the resulting gap was too wide due to the width of the blade.

Today, while I was in Denver for other reasons, I dropped by Caboose Hobbies and found a thin Dremel diamond blade that looked to be perfect. It was $19 (yikes) but as no other solution is apparent, I bought it. After testing on a piece of scrap track I tried it on the track on the right side of the bridge:


The rail gap is so small in this picture that it is almost impossible to see. Look at the upper track, immediately to the right of the wooden bridge side. Below that track you can see the tools used -- the rotary tool with diamond blade, safety glasses (the blade really kicks up a lot of fine dust), and a simple box cutter I used to cut the plastic ties after the rail was cut.

The only problem was that after cutting it turned out that the track itself wasn't sufficently glued down on the right side of the cut. So, I added some glue (the white stuff at the bottom of the track in the photo) and used a pin to hold the track in place until dry.

Once dry I'll gently file the rail edges and test with a locomotive. If this works I will add the diamond blade to the track laying arsenal for special situations like this.

Wired .... but ...

20 pairs of feeder wire and 5 sets of switch machine wire, including the unwired one from the middle tier, have been completed, and the new track has been cleaned:


Alas, testing this morning found an electrical short somewhere in this picture. I've searched for the obvious causes with the newly installed wire, such as feeder wires reversed or broken wire insulation, and found nothing.

In the back of my mind I knew I should have been testing for shorts with the multi-meter as I made each wiring change -- but I didn't. Lesson learned. I will do so from now on.

When tracking down shorts the first step is to isolate parts of the circuit to narrow down the possible causes. Unfortunately, this is one big circuit except for the AR sections. (Hence the rational for power districts.) This may take some time to locate.

Thursday, March 26, 2009

Editing

Over the past couple weeks I've been editing the past posts in my spare time. The changes were mostly minor: improved some formatting and a little rewording. These changes reflect things I've learned through regular posting. I've also added Label words for each post, so searching for posts on a given topic will be streamlined.

Sunday, March 22, 2009

Weekend Update

Here's a picture of the layout as of Sunday evening:


The whole of the upper tier now has the blue roadbed in place and track has been laid up until where the north side switch ladder will be. The track has not had the feeder wires connected yet (all those black wires seemingly randomly placed above the layout are feeder wires that are connected to the track but not to the terminals).

In addition, you can't see it but in the past week I also: desoldered a bunch of the switches that were left over from the previous staging attempt; did some wiring work near/on the upper tier bridge (the feeder wires to the bridge track are now reached by disconnects to facilitate removing the bridge for maintenance); set up the Visio diagram for the upper tier; and began wiring the remaining switches on the south end of staging.

All in all, it was a good 4-5 hours work in the past week on the layout. Not as much as I'd like, but still making progress.

Nothing in the past week was particularly challenging -- just application of tried-and-true layout building techniques. My next step is to complete the wiring of this new track (including the south side switch machines), then clean and test it. Once that is done I'll finish up with the rest of the upper tier track.

I've begun shopping for the power cabinet components. That seems like a project that I may tackle before completing the middle and lower tiers of staging.

Monday, March 16, 2009

Design influences: Maps, Progressions, Prototypes, and Freelancing

For as long as I can remember I've had a fascination with maps. Road maps, topological, geological, panoramic, satellite -- you name it.

I love studing existing maps, but I've also loved drawing maps of imagined places. Some of these fantasy maps were quite involved and took literally months to complete. Usually I'd work on these in idle situations, such as listening to lectures in college or while on long plane flights.

My one driving interest in maps has always been the historical angle: how did things progress to where they are today? Every now and then I'll stumble across a book some like-minded soul created of the map history of a given area and I'll buy it and closely read every page.

This interest in maps, history, and progressions definitely influences my railroad design, although in different ways depending on whether the layout has a "prototype" or "freelance" theme:
  1. Prototype

    Model railroaders refer to a real railroad as a "prototype" and what we build as a model. So a prototype layout is one that attempts to duplicate a real railroad at a real time in history as closely as possible.

    For my outdoor layout I've chosen to model the Denver and Rio Grande circa 1884-5 between the cities of Salida and Leadville in Colorado. A love of maps is extremely helpful in creating this kind design because you'll need to conduct a ton of research -- including lots of maps -- from a variety of sources. Fortunately, the Colorado Railroad Museum in Golden and the Leadville Public Library are both rich sources of information. Once you have that information you can walk around the towns today and see abundant evidence of what existed over a century ago. The joy of prototyping is learning in great detail how a railroad (and its environs) used to be, or how it is today, and recreating that in minature.

  2. Freelance

    If you choose to invent your own railroad to model -- or perhaps a fictional division of an existing railroad -- you are "freelancing". Prototype modeling has gained a certain snob appeal amongst the model railroad elders in recent years, which is unfortunate because a great freelance road like the Utah Belt is as fascinating as a great prototype model railroad.

    For me, the joy of freelancing is similar to that of the joy of playing a "God" PC game like Sim City or Civilization -- only in far greater detail than any PC game could model. You are in effect the founder and owner of a railroad and its setting, and you can make the decisions as to how it evolved up to the era you are modeling. Of course, the more realistic your assumptions and constraints are, the more interesting your design challenges will be and the more realistic your result will be.

    So, when I started the preliminary designs for my N scale layout a year or so before we moved into this house, I recalled one of my favorite map-drawing scenarios from years earlier. In this scenario a town is founded on a central north-south river (usually, but not always, the Mississippi) in the central U.S. in the mid 19th century. A common occurance, only in this scenario the town leaders are unusually wise, plus a bit wealthier than average. The leaders choose to attract railroads to their town using the lure of a link with the river traffic plus a ready-built bridge across the wide river. From that point forward the town progresses to become a hub city in the transcontinental railroad network with only one difference: the city planners (me) have a bit more foresight than usual.

    This became the basis for the history of my current N scale layout. And although the layout is set in the present era, every single scene on the layout includes evidence of the history of the city and the railroad over the past 150 years.

Maps and railroads -- they seem to go together.

Sunday, March 15, 2009

Making sawdust

Sometimes it seems my main output while building wooden benchwork is sawdust. I used to really like the benchwork part of the hobby, but after a few layouts it has become a drag. Fortunately, I'm almost done with lower deck staging and the main layout uses mostly foam-based benchwork.

So here's where I am tonight:


The subroadbed for the upper tier staging is now completely in place -- and if you look closely you may notice that I put down 9' of additional track next to the wall, too. You can also see the plywood for the middle and lower tiers cut and laying roughly in place -- they were put there temporarily to see that they fit, but they'll be set aside until the upper tier is complete.

Speaking of that, my next task will be to put roadbed and track down for the rest of the upper tier, including connecting to the main layout. I'm looking forward to seeing how trains do with the upper tier slopes.

Once that's in place I'll probably build the power cabinet. Once the staging track is connected to the main layout track it will no longer be practical to test track with just a DC power pack and alligator clips -- I'll need to fully set up the power wiring, including auto reverse devices. So, it makes sense to build the cabinet for those power devices before setting up the devices.

Saturday, March 14, 2009

First Alcove bridge

As I mentioned yesterday I need to build bridges across the west alcove. Three, in fact (one per tier). The first one, for the upper tier, is complete:


1/2" plywood is sufficiently strong to hold N scale trains, the problem is that it will tend to bend and warp without supports (piers) every 12" or so. But the alcove span is 3'9" and I didn't want to build a support grid underneath because I wanted to permit maintenance access to the helix that will later be built in the alcove.

The solution is to use steel L-girders to force the plywood to stay stiff and level. Two L-girders are attached together using nut/bolt/washers and short (1/2") screws with a very wide head are used to attach the L-girders to the plywood. The plywood is supported at both ends by wooden piers. Once constructed test that it is level and adjust as needed (thin plastic shims may prove useful here).

This particular segment of plywood subroadbed was more interesting than usual because on the left side you can (sort of) see that the subroadbed divides into three parts, each with its own grade. I've mentioned this design element briefly in previous posts, but after this section is complete I'll add better photos and describe it in detail.

Friday, March 13, 2009

Design influences: second layout

Model railroading is a lifelong hobby, so they say, but for some reason most of us forget about it during our teens and twenties. We love trains as kids and again after we settle down, but almost every model railroader admits that the lure of girls, cars, and rock n' roll overwhelmed any interest in trains while we were young adults.

So it would have been for me except that my college was on the 4-1-4 system, in which a 1 month "winter term" was sandwiched between two normal 4 month semesters. We had great freedom in choosing our winter term project, and as a freshman I chose to build a model railroad.

I still had no idea about layout design, so on my first trip to the hobby ship I was referred to this layout book:


This was first published in 1956 and is still available today after 30 or 40 printings. Except for the reference to N scale it's basically unchanged from the original version.

Now, the author was Linn Westcott and as I said earlier he was from the old school of layout designers. In his philosophy scenery and realistic views took a back seat to cramming in as much track as possible. Still, he did include a few plans from other designers who tried to create plausible-looking layouts, and I eventually chose this one:

It's not evident until you study it closely, but what makes this layout work is that there is a yard on the left side, then on the right side the railroad climbs up a mountain through a series of switchbacks. The switchbacks add the air of plausibility to the setting -- clearly this railroad had to have tracks close together in order to climb up difficult mountain terrain. The theme is logging/mining, which coincidentally was the theme I'd chosen for this project (trying to justify it as an educational activity for my college).

I modified the plan slightly, reducing the length by 6" to fit into a bedroom and the width from 5' to 4' by reducing the yard at the bottom (it did seem like a huge yard for an otherwise small railroad, I rationalized).

I also knew nothing about construction but I got Westcott's book on model railroad benchwork (an updated version is still available today) and using his "cookie cutter" technique I dived into the building process. I made some mistakes but did get the structure built with a 2x4 gridwork and 1/2" plywood. Then I laid cork roadbed and track. I got so far as to build some kit cars (Colorado Midland -- this was standard gauge as I felt I wasn't ready to tackle narrow gauge just yet), some Campbell wooden structures, and even scratchbuilt a trestle bridge that supported two adjoining tracks -- I was pretty proud of that. I got started creating the base for the mountains when winter term ended and I went back to college (and got credit for the project). All in all a good learning experience.

Once again, alas, my parents moved shortly after the layout was built and only the train materials were saved -- the wood was dismantled and junked.

The main lessons I took to the next layout:
  1. On the plus side, the use of mountains and switchbacks is a good way to create realism while still fitting in a lot of track in a small place. This is because the train still goes "somewhere" vertically, if not so far horizontally. I would use variations of this mountain railroad theme on my next two layouts.

  2. On the minus side, operations that involves short distances of back-and-forth aren't so much fun, at least for me. I prefer relatively long runs. As a result I've never again created this kind of back-and-forth switchback layout, nor the similar industrial switching puzzle kind of layout.

  3. Remember my comments before about loving passenger trains? Yeah, I missed those on this layout. I ran some mixed trains but it wasn't the same. All my subsequent layouts have had passenger trains as a central feature.

  4. Some model railroaders live for steam, and this layout was based in the steam era in part because I was looking forward to running steam. However, I was born in the diesel era and I learned that for me steam is fun but not any more fun than diesel. Since building this layout I've usually had some steam for novelty sake but not as the main theme. Electric, on the other hand, is fascinating ... but that's for discussion of my third layout.

  5. And, of course, I learned that layouts have to be movable. Not exactly "portable", which implies the ability to be transported and set up within a short time, but at least the ability to pack and move to a location thousands of miles away. Every layout that I built after this one had moveability features designed in.
After this layout I did box up and keep the HO equipment I had for many years without ever using it. My next layout wouldn't be started until 9 years later.

More wiring


At first glance this may appear to be a mirror image of the picture from Sunday's post, but this is taken from the other side of the wall. The red/black Power District bus and terminals are complete through this section of staging, and the 3 blue/yellow Auto Reverse (AR) busses have been set up. In addition, the subroadbed for the upper tier track near the wall has been extended through the "window".

I'm now measuring and cutting the rest of the plywood subroadbed, while also working on laying road bed and track for the rear of the upper tier.

Looking at the photo one may wonder why the grid benchwork for staging ends so abruptly. If you refer back to my early post introducing this layout you'll see that there is a small alcove on the middle of this west wall, and that this will be the location of the helix that connects between the two decks. This picture is taken from a spot just next to that alcove, at the top of the stairs. The grid benchwork ends here, and a bridge will be built to connect this track to the track along the west wall on other side of the alcove. I'll post on the building of the bridge later, but fortunately I'll be reusing the bridge method I used with the first staging attempt, so it should go fairly quickly.

Monday, March 9, 2009

Wiring standards part 2: Amendment

One minor addition to the Wiring standards part 2: Terminals and Feeders post: The terminals will always have the black wire connections on left side, red on right side.

Why? Just because.

Sunday, March 8, 2009

North Staging Progress

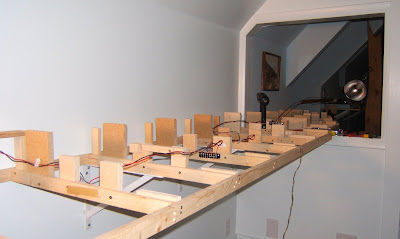
I now have all the piers in place for the north part of Lower Deck staging, and have the power district terminals and wiring partially in place, as shown here:


My next step is to complete the power district wiring, and then to run the buses for the 3 auto reverse (AR) sections (you can see some of the yellow/blue AR wire pairs in the photo). Once done with that it will be time for the 1/2" plywood subroadbed -- I got another 4x8 sheet at Home Depot today for the purpose. (Lumber prices, after the last few years of outpacing inflation, have suddenly dropped like a rock. This is logical given that construction demand has all but disappeared, but this means I may want to rethink some of my plans to take advantage of the lower prices.)

I won't go into the detailed process for setting up the piers, but for anyone considering tackling a similar project there are a few things to be aware of before starting:
  1. Model Railroad CAD software can plan the locations of our track down to 1/16th of an inch in 3 dimensions, but expect to make many adjustments tranferring those virtual locations to reality. This is especially true if building along a wall, as I am here, as walls are very rarely straight and, in the case of my garage loft, can skew off center by an inch or more from one end to the other. So you can't rely on the wall as a horizontal reference point. Ditto for the floor as a vertical reference point -- floors are rarely level to the fine accuracy that our CAD software assumes they are. So, when setting up your horizontal measurements use a few local reference points then draw lines to make sure that the track locations you've plotted from different locations line up nicely before doing any actual building. I pencil in the track locations on the girders themselves. Similarly for vertical measurements, always link up to the new part of the layout to the existing layout and adjust levels and grades as needed to compensate.

  2. Levels are your friend. I use 3 levels in the measuring process: A 6+ ft level for assuring piers are consistent (either level or at grade) over a long distance, and also for determining required grades over long distances; a 2 ft level for near distance pier-to-pier alignments; and a 9 inch level for checking that piers are level side-to-side.

  3. Fix mistakes as you make them. Sounds simple, but when you are in the middle of a long process like this (62 individual wood pieces, each cut to size and painstakingly put into exact place, at about 5-6 per hour) it's tempting to ignore a mistake "for now" and press on in hopes of reaching completion sooner. Well, at least it is for me. I really have to force myself to measure fully everything after each new piece is in place and redo it if necessary -- but this practice is time-saving in the long run. Fortunately, after a while of doing repetitive work you get so that your mistakes are rare.

One other point to note has to do with vertical curves. You'll see a reasonable amount of discussion on this topic on layout design forums, but most of the detailed write-ups I've seen use HO scale, and thus often need adaptation for N scale.

For this implementation I'm letting the 1/2" plywood subroadbed provide the smooth spiral transition from level to grade and back again. Doing this does require planning the vertical curve such that the 1'-apart piers will provide the support at the right places in the transition and that the joints in the plywood subroadbed occur only at places where the grade is constant -- since we need continuous plywood throughout the transition to make sure it is smooth.

In the past week this has been my main project. However, I've also done a little bit of work on the planning of the switch automation. More on this in a couple weeks after all the staging track is in place.