As an update to this post I'll add the following:
First, the CharlestonDigitalTrains web site is now showing very low inventory, missing most of the items they used to carry. I'm now using Wig-Wag Trains for DCC stuff.
Second, note that Wholesaletrains.com also has great prices on Atlas flex track.
And, yes this means I'm thinking ahead for the winter and getting back to work on the iNdoor layout. First order of business: extending the line from the middle-tier staging onto the main layout.
Thursday, October 14, 2010
Sunday, October 10, 2010
Towards Stairways
The last post covered work through the morning of September 5th. With the digging done and dirt tamped down the next steps were to put the edgings in place and the fabric cloth down to cover the dirt pathways. These next two pictures taken the morning of September 18th show that work has been complete and, in addition, the first ton of sand has been added on the ground of the pond patio:

That picture is from the driveway side of the pond patio. The edge of the pond is to the right, reflecting the morning light. The patio is straight ahead, with green edging on the sides, and a bit of white fabric cloth is showing underneath the sand. The construction of this patio will be standard flagstone-on-sand.
At the bottom of that photo you can see the newly-added dirt is sloped away from the patio edging. Erosion is a definite concern. I made sure that the slope is no steeper than 1-in-2 (about 33%) and tamped it extensively. However, I will be adding in embedded stakes and something to cover this during the winter to prevent erosion. You can also see a black-painted stake in front of the edging - the track will be running along this side of the patio and then along the driveway side of the pond.
One thing you can see in this photo and the next are a lot pine needles on the ground -- a reality of this time of year. This next picture is from the front of the house and shows the edged pathway extending from the pond patio:

The next three pictures were taken yesterday. This first one was taken from the pond patio looking south toward the front patio:

You can see flagstones on the ground. Actually we won't have any flagstones on the pathway -- that will be "red breeze" like the bridge approaches -- but these are staged for use on the pond patio. I started to place those then I realized it would be better to have the rest of the sand first.
This next one is from the south side of the front patio looking north towards the pond:

The rock walls and the fabric cloth for the pond patio are complete in this photo. You can also see the first two steps on the stairway to the front porch. I decided to use something that looked "natural" but was somewhat varied from what we have elsewhere in the garden. These are "siloam" rock steps -- basically slabs of siloam rock that have a flat surface to be used as stones. I am trying for 7" risers and 11" steps, but of course it is approximate. A ton of this type of rock is about $100, which is enough for 3 steps. Getting these into position involves a lot of trial and error, and the time involved depends on your experience and what compromises you'll accept. I focused more on safety than on looks, but I think it is okay.
Here is the last photo for this post, which is just in front of the front stairs:

That photo was taken late yesterday afternoon. After much consideration of possible building materials for the stairway from the front porch I decided to start with a deck extension, shown in this photo, and then transition to stone steps.
Last weekend I put in the concrete piers for this structure -- basically just pre-molded piers, placed in dug holes and leveled, then surrounded by poured concrete (one 60 pound bag per two piers). This weekend I built the substructure using pressure-treated fir and strong tie connectors.
There is still a little work to be done at the transition areas on the porch side and the left side, and I worked on some of that today. I actually rebuilt the bottom two porch stairs. It turns out the second porch stair was misconstructed and was shorter than the other two, which made the stairway somewhat awkward to use. I took the stairs off and added wood extenders to make the stair normal width. This also will serve to extend the bottom stair over this new deck, so the transition will look natural.
My next step is to finish off this structure, then work on finishing the stairs connecting the front patio to the front porch. Will it be done by Hallowe'en?
More outdoor paths
Following up on the last post, construction began with the patio area on the south side of the pond. I wanted to have a gathering spot near the pond and that place made sense due to proximity to the footbridge staircase and also being a logical connecting point for a stairway to the driveway and a path to the front of the house. The patio will be made of "Colorado Rose" flagstone, which not only fits nicely but is also mostly free as a neighbor gave me their leftover flagstones.
The first challenge was that the patio area needed a lot of dirt fill to raise it up. Partly this was because I wanted the patio higher than the existing ground anyway, but also in part because I want to raise the sides of the pond early next year, as noted in the last post. I created walls to hold the dirt in using the old pieces of ground-contact 4x6 beams, held in place with 12" rebar pounded into the ground. Now, where to get dirt to use as fill?
Well, part of the rest of the plan was to build a flat patio in front of the house, roughly 8x10, and to have stairs down to the patio from the front porch. The front patio would connected to the pond patio via a 3.5' wide path. Since the ground in front of the house was fairly steeply sloped I would need to dig quite a bit to create a flat spot for the front patio and the pathway. So, I started digging the dirt for the front patio and using it to fill in the pond patio.
By September 5th progress had been made. This first picture shows the pond patio area, taken from the footbridge:

Compared to the pictures of the same area in the last post much has changed. You can see the dirt fill-in, varying in depth from 6" to over 2' at the far end of the picture near the driveway. The dirt has been tamped down several times, watering between each iteration, to make it solid. You can see the start of building green metal edgings -- these edgers are 4" tall and will add that much height to the patio. (They were in place by the end of the day on the 5th.)
If you look closely you'll also see evidence of an electrical conduit Near the top of the photo is a black-topped skimmer box for the pond, which houses the pump. Just to the right of that is a grey pipe, curved, that is sticking out of the ground. I used 1/5" schedule 80 pipe and ran 20' of it under the patio. This will all me to later add an electrical box at that location, both for powering the pond pump (and future lights) but also for general outdoor electrical outlets. The pipe opening is covered and will be this winter to keep it clean and dry inside.
Finally, note the colored stakes gathered on the ground at the bottom of the photo. As planned elements are built the stakes are removed and sometimes reused.
This next photo, taken at the same time, shows the view from the pond patio area looking south:

This shows that the front patio has been dug out as has the pathway between the two patios. The ground near the bottom of the photo has been tamped down as that is where the dirt fill began. The most prominent feature is the new rock wall along the new pathway. We inherited quite a few walls in the front yard built of these types of rocks, and the same rocks were used as edging in various places. I had to remove quite a few of the rock edgings during construction of the pond and stream, and even more during construction of the foot bridge where the bridge ends at a rock wall. As part of this project I re-stacked the rock wall near the footbridge and used the leftover rocks for this wall.
The overall effect from a distance works well, giving the front yard a tiered effect, but flowing rather than rigid, uniform tiers. Plus the added advantage of reusing materials, thus saving money.
At this point the cost of the patios had been remarkably low. The conduit and rebar together were under $75 and everything else was reused. For the next section I'd need to buy more edging, as the leftover edging from the bridge project ran out, adding about $100, plus a couple of tons of sand at under $15 each (the savings of picking up sand yourself rather than buying the bagged stuff or having it delivered is stunning). Costs would go up just a bit with the stairs, but I'll cover that and the last month's work of construction in the next post.
Saturday, October 9, 2010
Outdoor paths
So my last post was 2 1/2 months ago. Just like last summer, I have again failed to keep the blog up-to-date while garden railway work was in progress.
So, it's safe to say that this summer wasn't as productive as last summer. OTOH, last fall at this time I had broken my rib and had to stop work early, whereas this year I should have at least 3 more productive weeks ahead of me, helped by the warm October we are having.
My last words from the last post on June 28 were: "If things go well I hope to have the roadbed for the main line roughly in place by the end of the upcoming holiday weekend." If only. Two things really impacted progress this summer. First, I was talked into volunteering for a local community organization, right about the time of that last post, and it has taken a ton of time. Second, I had a serious design problem to solve regarding track locations and, as has happened before, this caused me to stop progress until I found a satisfactory solution.
What I eventually figured out was that I needed to plot out in detail the locations of track, garden pathways, and underground electrical conduit in advance before starting any actual work. Otherwise if I started any one of those three without determining the other two in advance I could cause myself all sorts of trouble later on. Furthermore, the track locations in particular had to be very exact regarding grades.
The net is that I've now made a lot of progress on pathways and even electrical conduit. I also have a clear pathway for the main tracks, and even have bought a cool bridge for crossing the stream. But, alas, there will be no trains running in the garden this year. But we are now SO CLOSE -- next spring is a near certainty.
For reference, here is what the front garden, just south of the pond, looked like on June 13th. You see a lot of overgrown grass and two boxes that will be raised planters:

The month of July was spent contemplating, measuring, and some digging. In August I had a local stump removal guy get rid of the stump near the top of the porch stairs that I mentioned in the last post was causing some problems. Finally, on the weekend of August 21-22, I started seriously plotting out the locations of the track (using black paint and stakes, very carefully setting out 12' radii, often in difficult-to-reach locations), followed by locations of walls (green), pathways (orange), and electrical conduit (blue). The next several pictures show how it all looked after locations were all diagramed. This first is in the area near the bottom of the bridge stairs, and shows the future patio bordered in orange, plus some blue (electrical) and black (train) lines:

This next photo shows the north side of the pond and the lines for three train tracks in black. The two on the right are the passenger station in Leadville, while the on the left is the track to the freight depot. Yes, this matches, schematically, the actual tracks in Leadville in 1882:

The next photos shows the ground on the west side of the footbridge, and if you look closely you can see the black-painted path for the single-track line that will go over the stream using that cool bridge I mentioned earlier. As with all other painted lines, I included stakes to mark the spot in case the rain washes away the paint:

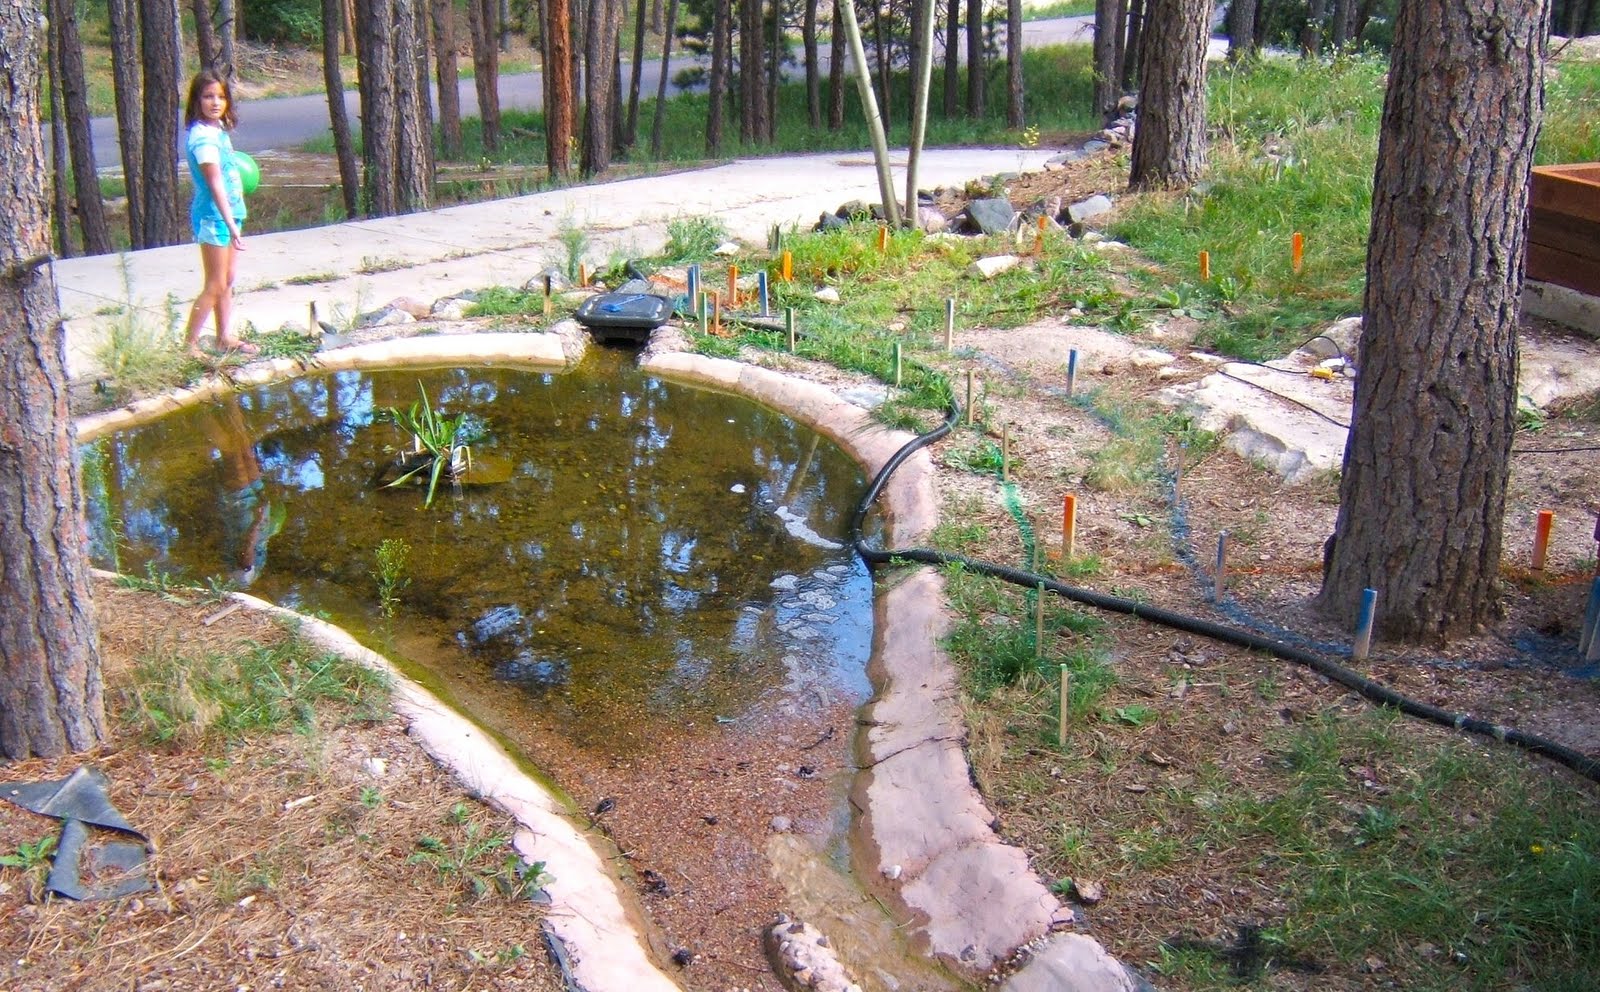
Here is another view of the pond and the south side of the pond, this time taken from the footbridge. Emma, now 10 (we no longer have any children in the single digits!), is posing alongside the pond. You can see various black, green, blue, and orange lines. Note the green walls near the south side of the pond. After maintaining goldfish and pond plants for a summer in the pond one regret I have is that the pond is only 11" deep. Next year I intend to raise the sides of the pond by as much as 1' to allow for a deeper pond, one that supports a greater variety of fish and plants. The adjacent patio will thus be elevated to match the higher height of the pond:

This next picture shows the raised planters. You'll see the smaller planter has been moved to be higher and next to the larger one ... something that became obvious to me after planning everything out. You call also see lines of various colors all over and, if you look closely at the top of the photo, you can see how the ground near the porch is now several feet lower (due to digging), and there is evidence of the pile of leftover tailings from a stump:

This final photo shows the area in front of the porch. The orange lines show the boundaries of the stairs down from the porch, and a patio in the middle of the yard. The plan is to provide for several "gathering areas" for people to view the garden and the trains. It's not possible to really see in the photo, but in addition a two-track siding is planned (using black lines) that will go underneath the stairs from the porch. There also is a blue line for an electrical conduit underneath the stairs:

Now, here's the thing: the plan shown in these photos has happened, with only a few adjustments. No, the tracks aren't in place yet (dammit), but everything else is well on it's way, and that means that everything will be ready for the track in those exact locations early next year.
The next post will show progress on constructing the pathways, patios, and electrical conduits.
So, it's safe to say that this summer wasn't as productive as last summer. OTOH, last fall at this time I had broken my rib and had to stop work early, whereas this year I should have at least 3 more productive weeks ahead of me, helped by the warm October we are having.
My last words from the last post on June 28 were: "If things go well I hope to have the roadbed for the main line roughly in place by the end of the upcoming holiday weekend." If only. Two things really impacted progress this summer. First, I was talked into volunteering for a local community organization, right about the time of that last post, and it has taken a ton of time. Second, I had a serious design problem to solve regarding track locations and, as has happened before, this caused me to stop progress until I found a satisfactory solution.
What I eventually figured out was that I needed to plot out in detail the locations of track, garden pathways, and underground electrical conduit in advance before starting any actual work. Otherwise if I started any one of those three without determining the other two in advance I could cause myself all sorts of trouble later on. Furthermore, the track locations in particular had to be very exact regarding grades.
The net is that I've now made a lot of progress on pathways and even electrical conduit. I also have a clear pathway for the main tracks, and even have bought a cool bridge for crossing the stream. But, alas, there will be no trains running in the garden this year. But we are now SO CLOSE -- next spring is a near certainty.
For reference, here is what the front garden, just south of the pond, looked like on June 13th. You see a lot of overgrown grass and two boxes that will be raised planters:

The month of July was spent contemplating, measuring, and some digging. In August I had a local stump removal guy get rid of the stump near the top of the porch stairs that I mentioned in the last post was causing some problems. Finally, on the weekend of August 21-22, I started seriously plotting out the locations of the track (using black paint and stakes, very carefully setting out 12' radii, often in difficult-to-reach locations), followed by locations of walls (green), pathways (orange), and electrical conduit (blue). The next several pictures show how it all looked after locations were all diagramed. This first is in the area near the bottom of the bridge stairs, and shows the future patio bordered in orange, plus some blue (electrical) and black (train) lines:

This next photo shows the north side of the pond and the lines for three train tracks in black. The two on the right are the passenger station in Leadville, while the on the left is the track to the freight depot. Yes, this matches, schematically, the actual tracks in Leadville in 1882:

The next photos shows the ground on the west side of the footbridge, and if you look closely you can see the black-painted path for the single-track line that will go over the stream using that cool bridge I mentioned earlier. As with all other painted lines, I included stakes to mark the spot in case the rain washes away the paint:

Here is another view of the pond and the south side of the pond, this time taken from the footbridge. Emma, now 10 (we no longer have any children in the single digits!), is posing alongside the pond. You can see various black, green, blue, and orange lines. Note the green walls near the south side of the pond. After maintaining goldfish and pond plants for a summer in the pond one regret I have is that the pond is only 11" deep. Next year I intend to raise the sides of the pond by as much as 1' to allow for a deeper pond, one that supports a greater variety of fish and plants. The adjacent patio will thus be elevated to match the higher height of the pond:
This next picture shows the raised planters. You'll see the smaller planter has been moved to be higher and next to the larger one ... something that became obvious to me after planning everything out. You call also see lines of various colors all over and, if you look closely at the top of the photo, you can see how the ground near the porch is now several feet lower (due to digging), and there is evidence of the pile of leftover tailings from a stump:

This final photo shows the area in front of the porch. The orange lines show the boundaries of the stairs down from the porch, and a patio in the middle of the yard. The plan is to provide for several "gathering areas" for people to view the garden and the trains. It's not possible to really see in the photo, but in addition a two-track siding is planned (using black lines) that will go underneath the stairs from the porch. There also is a blue line for an electrical conduit underneath the stairs:

Now, here's the thing: the plan shown in these photos has happened, with only a few adjustments. No, the tracks aren't in place yet (dammit), but everything else is well on it's way, and that means that everything will be ready for the track in those exact locations early next year.
The next post will show progress on constructing the pathways, patios, and electrical conduits.
Subscribe to:
Posts (Atom)