Showing posts with label outdoor design. Show all posts

Saturday, October 9, 2010

Outdoor paths

So my last post was 2 1/2 months ago. Just like last summer, I have again failed to keep the blog up-to-date while garden railway work was in progress.

So, it's safe to say that this summer wasn't as productive as last summer. OTOH, last fall at this time I had broken my rib and had to stop work early, whereas this year I should have at least 3 more productive weeks ahead of me, helped by the warm October we are having.

My last words from the last post on June 28 were: "If things go well I hope to have the roadbed for the main line roughly in place by the end of the upcoming holiday weekend." If only. Two things really impacted progress this summer. First, I was talked into volunteering for a local community organization, right about the time of that last post, and it has taken a ton of time. Second, I had a serious design problem to solve regarding track locations and, as has happened before, this caused me to stop progress until I found a satisfactory solution.

What I eventually figured out was that I needed to plot out in detail the locations of track, garden pathways, and underground electrical conduit in advance before starting any actual work. Otherwise if I started any one of those three without determining the other two in advance I could cause myself all sorts of trouble later on. Furthermore, the track locations in particular had to be very exact regarding grades.

The net is that I've now made a lot of progress on pathways and even electrical conduit. I also have a clear pathway for the main tracks, and even have bought a cool bridge for crossing the stream. But, alas, there will be no trains running in the garden this year. But we are now SO CLOSE -- next spring is a near certainty.

For reference, here is what the front garden, just south of the pond, looked like on June 13th. You see a lot of overgrown grass and two boxes that will be raised planters:


The month of July was spent contemplating, measuring, and some digging. In August I had a local stump removal guy get rid of the stump near the top of the porch stairs that I mentioned in the last post was causing some problems. Finally, on the weekend of August 21-22, I started seriously plotting out the locations of the track (using black paint and stakes, very carefully setting out 12' radii, often in difficult-to-reach locations), followed by locations of walls (green), pathways (orange), and electrical conduit (blue). The next several pictures show how it all looked after locations were all diagramed. This first is in the area near the bottom of the bridge stairs, and shows the future patio bordered in orange, plus some blue (electrical) and black (train) lines:


This next photo shows the north side of the pond and the lines for three train tracks in black. The two on the right are the passenger station in Leadville, while the on the left is the track to the freight depot. Yes, this matches, schematically, the actual tracks in Leadville in 1882:


The next photos shows the ground on the west side of the footbridge, and if you look closely you can see the black-painted path for the single-track line that will go over the stream using that cool bridge I mentioned earlier. As with all other painted lines, I included stakes to mark the spot in case the rain washes away the paint:


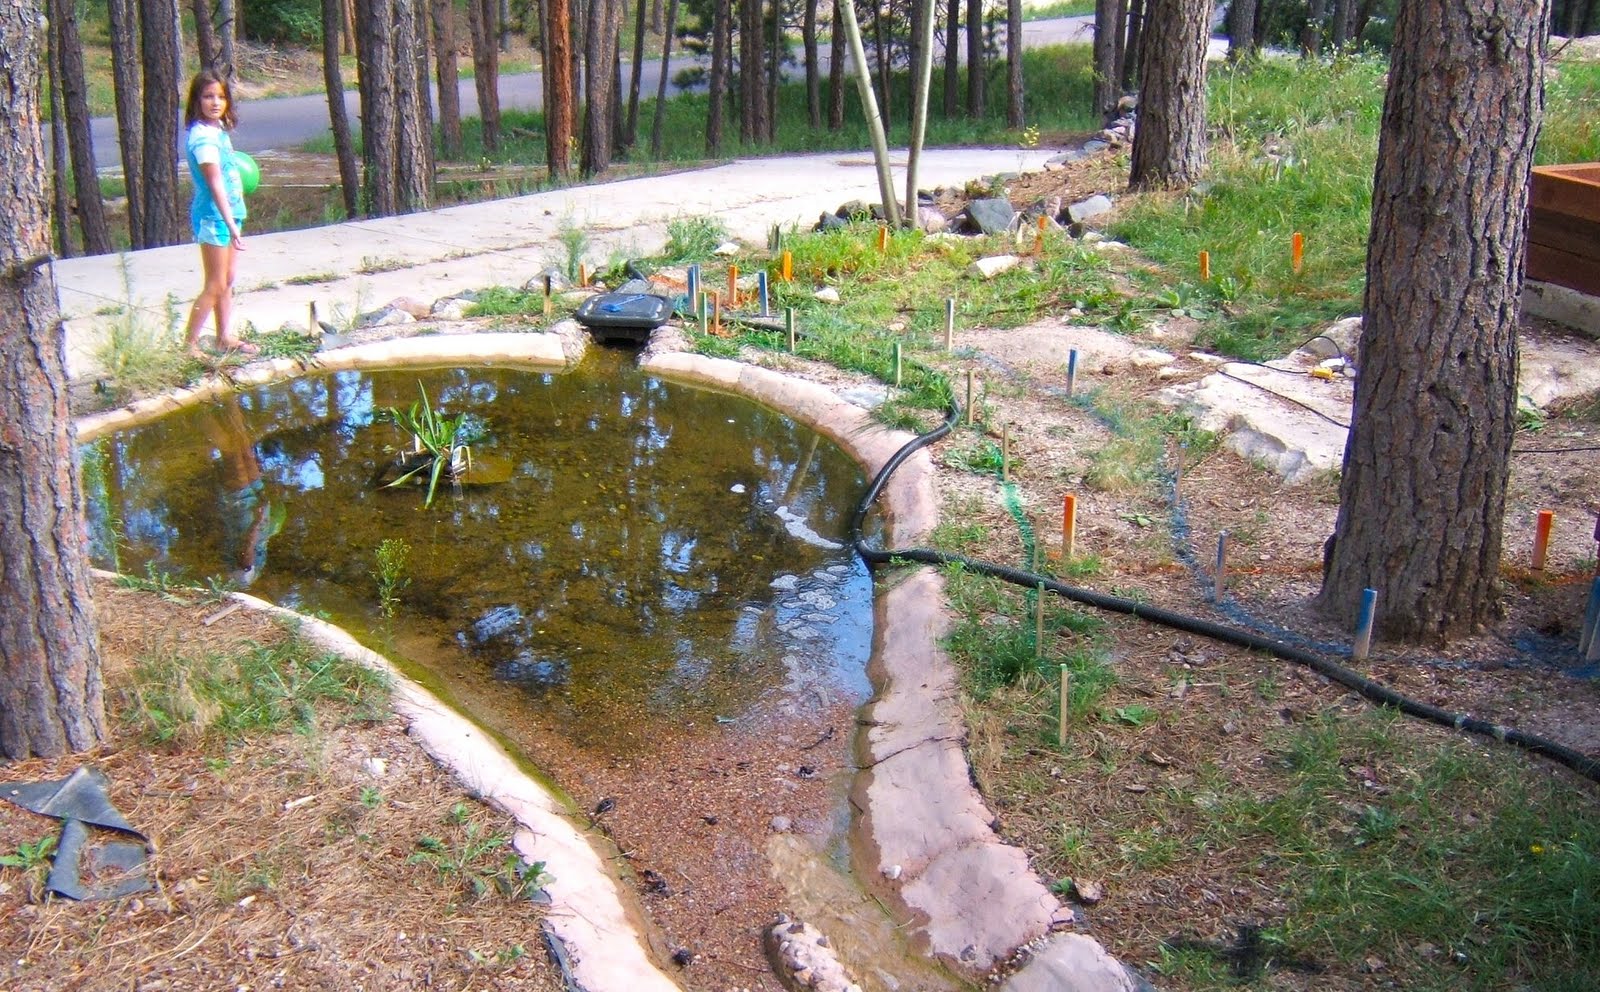
Here is another view of the pond and the south side of the pond, this time taken from the footbridge. Emma, now 10 (we no longer have any children in the single digits!), is posing alongside the pond. You can see various black, green, blue, and orange lines. Note the green walls near the south side of the pond. After maintaining goldfish and pond plants for a summer in the pond one regret I have is that the pond is only 11" deep. Next year I intend to raise the sides of the pond by as much as 1' to allow for a deeper pond, one that supports a greater variety of fish and plants. The adjacent patio will thus be elevated to match the higher height of the pond:

This next picture shows the raised planters. You'll see the smaller planter has been moved to be higher and next to the larger one ... something that became obvious to me after planning everything out. You call also see lines of various colors all over and, if you look closely at the top of the photo, you can see how the ground near the porch is now several feet lower (due to digging), and there is evidence of the pile of leftover tailings from a stump:


This final photo shows the area in front of the porch. The orange lines show the boundaries of the stairs down from the porch, and a patio in the middle of the yard. The plan is to provide for several "gathering areas" for people to view the garden and the trains. It's not possible to really see in the photo, but in addition a two-track siding is planned (using black lines) that will go underneath the stairs from the porch. There also is a blue line for an electrical conduit underneath the stairs:


Now, here's the thing: the plan shown in these photos has happened, with only a few adjustments. No, the tracks aren't in place yet (dammit), but everything else is well on it's way, and that means that everything will be ready for the track in those exact locations early next year.

The next post will show progress on constructing the pathways, patios, and electrical conduits.

Wednesday, June 16, 2010

Outdoor Track

I've mentioned that the outdoor layout will be set in early 1880s Leadville (front yard) and Salida (back yard). Currently my target date is 1882, but I've wavered a bit on that. I'll comment more on that (someday) in a post on the outdoor layout design, but for this post let's focus on the track.

I've mentioned before that most outdoor track is "gauge 1" but the track style varies depending on whether we are modeling narrow or standard gauge. Because I am modeling 3 foot narrow gauge, my official scale is Fn3 -- "F" (1:20.3 scale), "n" = narrow, 3 = 3 feet. There is a lot of track available for Fn3 modelers, including Llagas Creek and Sunset Valley (I'd link to Sunset Valley's site, but they are having apparent site problems right now.) There are other manufacturers, but those tend to be the most respected in terms of "authenticity" of appearance.

Alas, I have two problems with their track. First, is cost. Over $3/foot for a normal section of track from the former, over $5/foot for the latter. Ok, maybe I could live with that, given that I spent over $1k on the Aquascapes stuff for the pond. But the second problem is that their appearance matches NG (narrow gauge) track in the 1900s, which granted is the era most people model. But in the 1870s and early 1880s this was what the track looked like:


That's Palmer Lake not long after the Rio Grande RR first came through. Look at those ties -- not a nice rectangular one in the lot. Tie plates? Not even sure they were invented then. And given the HUGE drive to make NG track as low cost as possible to appease the northeast financiers, tie plates would have been avoided as an unnecessary luxury. And ballast? We don't need no stinking ballast!

The truth was the NG movement in the U.S. from 1870-1883 was based largely on a myth of cost savings, and those constructing the railways were determined to ring out the cost savings even it it meant sacrificing long-term high maintenance costs in exchange for short term construction costs.

By 1882 in Leadville things probably weren't so extreme, but alas I can't find any pictures of the track at that time. I can find some of Salida in 1880 (when the railroad first came to Salida and Leadville) and 1882 and it appears that in 1882 they were still using 7-foot wide NG ties, but they were somewhat more rectangular in shape. Of course new ties would have been swapped out for the original ones -- put straight into the dirt the original ties would have needed replacement very early.

By 1882 the Rio Grande was already coming to terms with the need to put standard gauge rails to any city where there was competition from other standard gauge lines. In 1880 they added a 3rd rail to the front range line, and by 1890 they would do the same to Leadville, in response to the arrival of the standard gauge Colorado Midland.

But having said that, in 1882 the Rio Grande would also have been counting on having to replace the ties several times before they needed to add standard gauge to Salida/Leadville, so I figure 7' ties are just about right. Also, when the railroad first came through ties were built from local wood. The local wood was quickly exhausted however (in Palmer Lake the foresters talk about the 1870s as a time when everything was clear cut, and the oldest trees today date from that decade), so ties had to be bought from external sources -- and usually those were more conforming to a rectangular shape than the ones that were hastily cut when the line was first laid.

So, for my track I want: 7-foot scale, very rough ties; light rail (to match the rail then used), and more of a sand-dirt roadbed than anything resembling ballast.

I am considering fashioning my ties from old bits of pressure-treated (p.t.) fir from the bridge project, with some kind of additional sealant to make them last longer. For rail, looking at the table of rail sizes (see third table from the bottom) and recognizing that early Rio Grande rail was 30 lbs, later to 40 lbs, I will probably go with the smallest rail I can find that can support standard flanges -- maybe code 205.

For the roadbed I am considering stained concrete, with sand put on to make it look like the dirt/sand roadbed at the time. I'm now working on marking out and leveling the subroadbed area for the first loop of track that I will lay. Once that is in place I can experiment with handlaying roadbed and track using these materials.

If that is successful I can start working on handlaying a stub switch (scroll to bottom of page) -- which was the cheaper form of switch that was common on NG railroads back then.

    Tuesday, August 11, 2009

    Outdoor Layout Introduction

    When we arrived in this house in late 2005 I knew I was going to build two layouts: one indoors in N and one outdoors. I had a pretty clear idea of the theme for the N scale layout, but I was less clear on the outdoor one.

    The theme of the outdoor layout is, perhaps surprisingly, significantly influenced by the choices I made for the theme of my indoor layout. This is because there is a general maxim in model railroad design to "not do the same thing twice". Usually this is in reference to a single model railroad, as in "don't build two small yards, build one big one", because we always have limited space and we should maximize the variety of the layout within that space.

    However, this can also apply to those of us who are lucky enough, or crazy enough, to build two layouts at the same time. In such a case it's probably best if the two layouts are as different from each other as possible, so as to maximize your variety and hence your overall fun.

    So, my outdoor layout decisions were influenced by intentionally choosing NOT to do things I did on the indoor layout.

    Eventually the theme of the outdoor layout was set as follows:

    1. Narrow Gauge There is a certain romance to small narrow gauge railways, especially those that wind through difficult mountain passes to reach almost inaccessible small towns. But there is a also a strong appeal for huge mainline trains. Fortunately I satisfied my mainline urge with the indoor layout, so after seriously considering standard gauge options I decided I had to do a narrow gauge -- a style of layout I've never built before.

    2. Prototype After unsuccessfully trying to find a prototype to match my long list of "wants" for the N scale layout I decided to make it freelance. So naturally this meant that the outdoor one needed to be a prototype. Initially I thought this would be a bit of a problem, as I also wanted a high-traffic prototype, and for most of their history narrow gauge railways were almost exclusively one-train-per-day-or-less lines. However, I did some research at the Colorado Railroad Museum and found that there was extensive traffic on the early narrow gauge lines, thus this meant that the era had to be ...

    3. 1880s Narrow Gauge had a very brief period of about 1870-1883 where it was "in vogue" among financiers who mistakenly believed it would lead to lower costs. Eventually that belief became exposed as a myth. Even before 1883 some of the most heavily trafficked narrow gauge lines were being converted to standard gauge, and by the late 1880s the standard gauge conversion movement was in full force. Therefore, in the 1880s a narrow gauge line could have the benefit of being somewhat established yet still support a high volume of traffic, but there were few high traffic narrow gauge lines after that era.

    4. Denver and Rio Grande I seriously considered other prototypes. First, I'd been flirting with the South Pacific Coast -- a line that ran from Oakland to Santa Cruz and wasn't converted to standard gauge until 1906. Of course, my interest in that line was largely caused by the fact that I lived so close to where it once ran when I lived in California. Eventually I concluded that it would be daft for me to live in Colorado, model a prototype narrow gauge line, and NOT choose a Colorado railway. (I know other Coloradoans, including Kevin Strong who writes for Garden Railways, who have chosen non-Colorado narrow gauge prototypes -- and that's cool. But this was my preference.) I then looked at other Colorado narrow gauge lines. But I eventually settled on the DRG because of what I found in ....

    5. Salida and Leadville I started my prototype search by looking at timetables and route maps. I wanted something with a variety of routes yet a large volume of traffic. Something in which narrow gauge was clearly king. Salida and Leadville -- up until the introduction of the 3rd rail for standard gauge in 1890 -- was exactly the sort of region I was looking for. Salida was meant to be on the Rio Grande east-west mainline en route to Gunnison and ultimately Salt Lake City, while Leadville was originally meant to be just a high-traffic spur to the north of Salida for the purpose of serving the intense mining traffic in the area. That meant Salida was from the start a major junction, and Leadville quickly became one too, in terms of all the branches that originated there. Eventually the DRG would settle on the Tennessee Pass route via Leadville for their east-west mainline, and the route from Salida to Gunnison would become almost an afterthought. But in the 1880s all the routes in the upper Arkansas River valley were big.

    These themes didn't happen overnight -- indeed I didn't settle on all of them until 2 years after we moved in and I'd had the opportunity to visit both Leadville and Salida. During that time I'd built yet another temporary layout as an experiment and also succesfully installed R/C battery power in one of my F scale Mogul locomotives. I was ready to go. The problem was, how was I going to map the prototype rail track arrangements onto my decidedly non-symmetric, non-level lot? That is the topic for the next post.

    Monday, April 6, 2009

    Outdoor model train scales

    In the earlier post on gauge and scale I mentioned that the "large", outdoor scales range in size from 1:20.3 to 1:32. While these may seem like random numbers, there is a very logical reason behind them, dating back to the early history of model trains.

    Some of the earliest model trains in the late 1800s were made by Märklin in Germany. They built three sizes of trains and named them "1", "2", and "3" gauge. All three were on the large size, reflecting the technology at the time. "1" gauge is 45 mm between the rails, about 1.77 inches.

    When Lionel started making electric toy trains in the early 1900s in the U.S. they decided to name their gauge "0", pronounced "zero", because it was somewhat smaller than "1" gauge. However, people reading "0" (zero) thought it was the letter "oh", and so "O" has forever been the name of 1:48 scale. The smaller O scale trains quickly surpassed the larger 1 gauge trains in popularity because they took up less space. While "1" gauge trains continued to be produced in smaller quanitities, "2" and "3" stopped being produced.

    Later in the 1930s Märklin came out with an even smaller scale, 1:87, and named it "half-oh", or "HO" for short (even though it was quite a bit bigger than half of 1:48). HO quickly leaped ahead of O in popularity, as many other manufacturers followed Märklin's lead. "1" became an almost forgotten gauge.

    Fast forward to the late 1960s when a family named Lehman in Germany decided to build electric trains that could run outdoors. They chose "1" gauge track and named their new company LGB for Lehman Gross Bahn -- which translates literally to "Lehman Large Trains". For their initial line of trains they chose to model European prototypes that used a 1 meter narrow gauge. A 45 mm gauge track, when used to model a meter gauge prototype, yields a scale of 1:22.5. This soon became known informally as "G" scale. However, "G" was never officially recognized as a scale, and today people often mistakenly use the term "G" for any train running on "1" gauge track.

    LGB trains were a hit, first in Europe and then in the states. In the 1970s LGB introduced more trains, including models of standard gauge European trains and 3-foot narrow gauge U.S. trains. LGB was vague about the scale of these new models, in part so that the cars from one size prototype wouldn't look out of place in the same train with others, and this resulted in a lot of confusion. (Today some modelers feel that LGB's failure to provide accurate scale info with their models ultimately contributed to their sales decline and their recent bankruptcy.)

    In the 1990s and 2000s many other manufacturers entered the large scale train market and fortunately almost all of them provided specific scale info. For "1" gauge models based on a 3-foot U.S. narrow gauge prototype the scale of 1:20.3 is correct. The NMRA has recognized this as "F" scale . For "1" gauge models based on standard gauge the correct scale is 1:32, which is now recognized as "H" scale. It's easy to remember these letters because F-G-H are all "1" gauge scales, based on 3 ft gauge, 1 meter gauge, and standard gauge prototypes respectively.

    Unfortunately, before H scale was established Aristocraft introduced a line of "1" gauge products based on standard gauge prototypes in 1:29 scale. As such the trains were somewhat larger than they should be given the wheelbase of the trains. Aristocraft chose 1:29 apparently because this allowed the LGB narrow gauge boxcars to look correctly proportioned next to Aristocraft product. USA Trains copied this practice, and their product line became very popular due to their lower prices and US prototypes, so other manufacturers followed their lead. Today large scale modelers now have to be aware that some standard gauge product is 1:29 scale and some is 1:32, and to try not to mix them because they will look funny together if you do.

    Just to complete the confusion, a lot of the non-train models that are available for adding scenery to your outdoor layout are 1:24 scale, which kinda-sorta works with some of the other scales if you don't look too closely, or if you separate the 1:24 models from the trains visually.

    One other point to note is that although all the "1" gauge trains will run on the same track, there are still separate lines of F, G, and H scale track. That's because while the rail gauge is the same, tie sizes vary greatly between scales.

    Now, having said all of the above its worth noting that Garden railroaders tend to be a lot more relaxed than indoor modelers about prototypical accuracy. Many happily run trains of mixed scales. Others may run all their narrow gauge trains one day and all their standard gauge the next. And despite such sacreligious behavior they amazingly still get their layouts featured in Garden Railway magazine! :)

    For my outdoor layout I have chosen a U.S. 3 foot narrow gauge prototype, so my scale is F (1:20.3). Actually, to be precise, my scale is Fn3, reflecting the 3 foot narrow gauge. However, the "n3" is usually not mentioned since virtually everyone in F scale is doing narrow gauge.